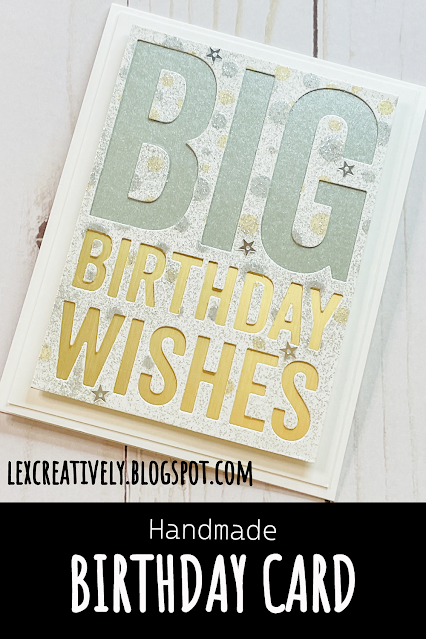
A tutorial to make a handmade card for a birthday using products by Brutus Monroe, Cosmic Shimmer, My Favorite Things, Tonic studios and more! #cardmaking #handmadecard #homemadecard #cardtutorial
NOTE: Affiliate links are used in this post at no additional cost to you. I receive a small percent of compensation when you click through and shop using the provided links. This helps me to maintain this blog. Thank you for your support!
Well, hello there! It's certainly been a while! Things just seemed to get very busy for me the last half of 2021! That doesn't mean I stopped creating though! So, over the next couple of weeks, I plan on posting projects you haven't seen yet. Let's start with this blingy birthday card for my bestie!
INSTRUCTIONS:
As usual, I cut out my A2 top-folding base and a 4" x 5.25"panel (and eventually another panel!) using my Fiskars trimmer, and scored the base with the Bira scoring tool.
I used the MFT confetti stencil set, and attached one stencil with pixie spray to the panel, and used a palate knife to spread the silver chroma glaze. Once that dried, I did the same thing with the second stencil, using the gold chroma glaze.
Once that layer was dry, I used the MFT big birthday wishes die in my Spellbinder machine to cut out the panel. (Yes, I had just used this die a couple posts ago, but I love it!)
The die took a lot of the stenciled dots out, and it just wasn't shiny enough for me, so I put some silver cosmic glitter in the Nuvo glitter mister, placed the panel in my splatter box (not the fancy one you can buy, just a cardboard box!), sprayed it with adhesive spray, and then pumped on some glitter.
Once dry, I trimmed the panel down because the words from the die were crooked on the panel, so I needed to straighten it out. I used the Tim Holtz trimmer for that. It's easier than using the Fiskars for this.
Then I cut some pieces of the silver and gold cardstock to adhere under the words. I like these cardstocks because they both have a matte, yet shiny finish! I sprayed the back of the panel with adhesive, and attached the cardstocks, and cut off any excess with scissors.
Since the panel was much smaller now, I decided to cut another 4" x 5.25" panel out of the white cardstock for a mat. Since there was already a lot of shine, I decided white would work best!
For added dimension, I cut some double-sided tape to use to attach the panel to the mat, and glued the entire thing to the card base. Not sure with what glue, but either the spray or liquid will do! Ha, that rhymed! It also depends if you need more time to position the panel... then I go with liquid!
Even though the panel was already bling-tastic, I just had to add a few sequin! I thought a few of these little silver stars from Darice were a perfect touch!
SUPPLIES USED (alphabetically):
As a reminder, I may make a small commission when you make a purchase through the links below at zero cost to you! Thank you kindly for your support!
- Bearly Art - Precision Craft Glue
- Bira Craft - Multi-Purpose Scoring Board
- Brutus Monroe - Chroma Glaze - Gold
- Brutus Monroe - Chroma Glaze - Silver
- Creative Expressions - Cosmic Shimmer - Biodegradable Glitter – Bright Silver
- Darice - Tiny Star Silver Sequin
- Dollar Tree - Crafter's Square - Pop Dot Tape
- E6000 - Spray Adhesive
- Fiskars - SureCut Deluxe Paper Trimmer
- Michaels - Artist's Loft - Plastic Palette Knife
- My Favorite Things - Big Birthday Wishes Die-Namics
- My Favorite Things - Card-Sized Confetti Stencil Set (retired)
- Neenah - 110lb Classic Crest Cardstock
- Scrapbook.com - Craft Tweezers - Ergonomic Reverse Grip - Fine Tip
- Spellbinders - Platinum 6 die cutting machine
- Studio Katia - Embellishment Wand
- Thermoweb - iCraft - Pixie Spray
- Tonic Studios - Nuvo - Glitter Mister Spray Bottle
- Tonic Studios - Craft Perfect - Pearlescent Card - Luna Silver
- Tonic Studios - Craft Perfect - Satin Effect Mirror Card - Honey Gold
- Tonic Studios - Tim Holtz - 8.5 inch Trimmer
- Westcott - Straight Titanium Bonded Craft Scissors with Micro Tip
Can't find a product? Is it discontinued? Looking for a better price?


Your video really showed that shine! Wow, this is a beauty. I love the big, bold sentiment.
ReplyDeleteThanks for sharing your Birthday Cards project with us at Cut it Up!
Evelyn
http://mylittlecraftblog.wordpress.com
Thank you so much, Evelyn! Thanks for stopping by!
DeleteSuch a big and bold sentiment with all shine, So beautiful!
ReplyDeletePerfect for our current challenge!
Thanks for joining at Cut it Up Challenges.
DT Vinita