

As I warned in my last post, here is yet another monochromatic card! I promise to use more than one color soon!
My aunt had a major surgery, so I sent this off to her to send her some love and support. And by the way, everything went well, and she is recovering splendidly!
INSTRUCTIONS:
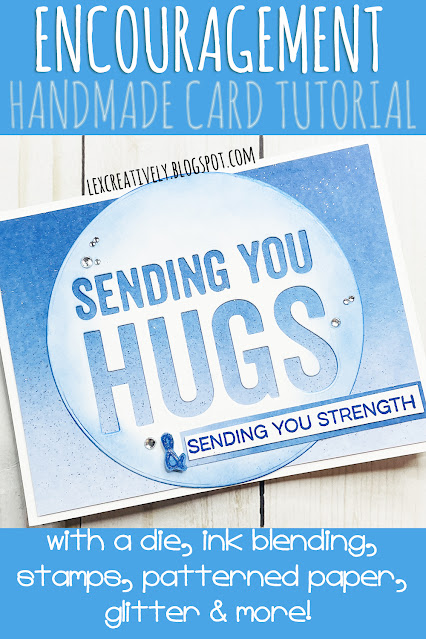
I started with a piece of blue ombre patterned paper, and I cut a piece with my trimmer to a 4" by 5.25" panel. I placed some silver glitter in my glitter mister bottle. Then I placed the panel in my splatter box, and sprayed it with some spray adhesive and then misted with glitter!
While the panel dried, I die cut a piece of white cardstock with the "sending you hugs" die with my die cutting machine, and then I used a circle die as a frame for it. I then blended some blue ink around the edge of the die cut circle with a blending brush.
For the rest of the sentiment, I stamped "sending you strength" on a scrap of white cardstock with the same blue ink with my stamping tool, and I cut it down to size with my trimmer. Then, I attached it with glue to a scrap of the ombre paper cut down with my trimmer to act as a border for the sentiment.
To tie the die cut and stamped sentiments together, I stamped an ampersand ["&"] from a planner stamp set onto a scrap of the ombre paper with the same ink and my stamping tool. Once the ink dried, I used a clear glitter gel pen to color over the stamped symbol. I used my mini scissors to fussy cut it out.
To assemble, I used spray adhesive and glue to attached the panel to an American A2 side-folding card base (made with white cardstock, a scoring board, and trimmer) with the folded side down, and then the die cut sentiment to the panel... not forgetting to add the center of the "D" using my tweezers! I then glued on the stamped sentiment and used a small piece of thin double-sided adhesive foam to pop up the ampersand.
For a little extra bling (of course!), I glued on a few rhinestones in two sizes (from a large set from Amazon that are actually for nails!) with the assistance of an embellishment tool.
And voila!
SUPPLIES USED (alphabetically):- Bira Craft - 12" x 12" Multi-Purpose Scoring Board
- Bira Craft - Easy Stamp Platform Tool
- Brutus Monroe - Foundations Dies - Circles
- Catherine Pooler Designs - Ink - Suede Shoes
- Creative Expressions - Cosmic Shimmer - Biodegradable Glitter - Bright Silver
- Craft Ink Blending Brushes
- E6000 - Spray Adhesive
- Recollections - Ombre Brights Paper Pad - 12" x 12"
- Rhinestones
- My Favorite Things - Essentials Sentiments
- My Favorite Things - Sending You Hugs Die-Namics
- Neenah - 110lb Classic Crest Cardstock
- Nuvo - Glitter Mister Spray Bottle
- Sakura - Gelly Roll - Stardust - Clear #700
- Scrapbook.com - Craft Tweezers - Ergonomic Reverse Grip - Fine Tip
- Scrapbook.com - Double Sided Adhesive Foam Strips
- Spellbinders - Platinum 6
- Spellbinders - STP-008 Planner Dates and Months
- Studio Katia - Embellishment Wand
- Tombow - Mono - Multi Liquid Glue
- Tonic Studios - Tim Holtz - 5.5" Mini-Snips
- Tonic Studios - Tim Holtz - 8.5" Trimmer

CHALLENGES ENTERED:
1. Die Cut Divas: Tone on Tone


3. Addicted to Stamps and More: Challenge #409 - Any Occasion

This is fabulous. Love the sparkle and the circle frame to the big sentiment.
ReplyDeleteThanks for joining us at Happy Little Stampers Anything Goes with Dies challenge.
Happy crafting!
Catherine x DT
Thank you, Catie!
DeleteI love monochrome cards, Lex and the design of this one is so well thought through. I wish I could catch the sparkle irl!
ReplyDeleteThanks for sharing with us at ATSM.
Hugs
Carol x
Wonderful monochromatic card! Thank you so much for playing along with the Kat Scrappiness July Card Challenge!
ReplyDelete